Sunday 23 January 2011


Metal Patchwork Quilt


My most recent project has been in the metal workshop which included learning to weld and I love it! Its all sparks, noise and molten metal - something elemental about the whole process. I wanted to make a metal patchwork quilt using 1mm steel and somehow incorporate the remains of an old patchwork quilt that I had as a child. The concept behind this is to parallel the strength of steel and the strength of family bonds, as shown by the quilt which has been handed down through 3 generations. These are some of the original quilt pieces- they contain fabric from my mum's dresses and and my dresses and pyjamas when I was little. So these material fragments are 50 to 60 years old. I can remember there were always hexagonal shapes of material and paper around the house. My mum used a metal template, paper and material to make the hexagons and then would hand sew them together. I tried to replicate her process and use some of my own children's clothes.


I cut out lots of metal hexagons using the plasma cutter. I loved this process, something about the repetition of cutting the shapes, I used to just get lost in it. And it was great when a hexagon dropped straight out the metal and landed on the floor with a satisfying tinkling noise. I then welded them together, firstly using oxyacetylene then mig welding. The mig welding was easier and faster. I also experimented bending the shapes between metal rollers to see in I could get a fold, like in a blanket. This proved fairly problematic when I put the bigger pieces of welded quilt through the rollers in that it fell apart into quite a few pieces which I had to weld back together.

The video shows me cutting out the hexagons with the plasma cutter. The best bit is the squeal at the end as the bit drops cleanly onto the floor. Satisfying!


I tried several ways to combine the material pieces and the metal pieces.


What was more successful was then using the metal piece I had cut the shapes out of, and draped the material through the holes. I feel this is starting to work better and and am going to continue to develop this further by making it more 3D, making the edges more ragged, maybe roll it and have it standing on the floor.


Here is the final piece. 


Monday 10 January 2011

Bronze Casting

On my sculpture course at Edinburgh College of Art, we are lucky to have a small foundry and we did a bronze casting workshop, which is one of the most exciting workshops I have ever done. The fire in the foundry, the heat and the molten metal were awesome and there was something primeval and archetypal about the whole process.
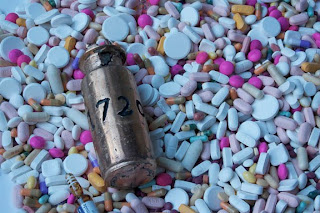
I made a bronze replica of an antique pharmacy jar which had found its way to me in a pharmacy I worked in. The result had 3 blow holes in it which made it look like some relic from a shipwreck or explosion. It was not what I was expecting but I liked it.


Pharmacy 2010
bronze, disused drugs


Pharmacy Jar
bronze


Pouring the bronze


wax model showing pour holes
and air vents


Friday 7 January 2011

Female Genital Mutilation


FGM (female genital mutilation) is a procedure involving the partial or total removal of the external female genitalia for cultural, religious or other non-theraputic reasons. It is predominantly practiced in regions of Africa and WHO estimates over 2 million girls are 'cut' each year. (Source: Int. 1997 report : AI index: ACT 77/06/97 what is genital mutilation?)
Apart from the human rights issues, there are serious health consequences, both physical and psychological to girls undergoing this procedure. It is usually carried out between the ages of 4 and 8 years old.
Responding to FGM is an ongoing art project for me with the aim to inform, educate and make people aware of this practice.

A poster and textile piece I made for my Basic Diploma in Art & Design in June 2008


FGM Poster
FGM Procedures Textiles, wood


This is my latest work on FGM. (December 2010) The models are made from salt dough and include stitching. The print is a screenprint from a photo.


FGM Type 1 screenprint


FGM Type1 salt dough


FGM Type 3 (no1) salt dough


FGM Type 3(no2) salt dough


Thursday 6 January 2011

Bread Sculpture


I have been working with bread and dough for the last two years. I like the feel of working with dough. You can knead it and thump it about. If you add yeast, it is all warm and soft to play with. Bread smells nice in the making, during and after cooking and also as it goes mouldy.
I made a series of 'breadheads'.


Breadhead No.1
sliced bread, milk


Breadhead No. 2
white flour, yeast
Breadhead No 3
sliced bread, milk


I use white flour, wholemeal flour, salt dough and sometimes I add yeast to get a more unpredictable effect. I like using zips in my sculpture! Zips can show if I am feeling open or closed about something. The three pieces below are bread fragment no.1 , my hand and three blobs. I like making blobs - I often feel they represent little parts of me.


Bread Fragment No1
white flour, yeast, zip


Hand
white flour, yeast, zip

Three Blobs.
white flour, wholemeal flour
yeast, zip, paper, drawing pins


Bread Bodies


I have made 3 bread bodies. They are based on my own torso which I cast using modroc. The first one, I put out into the woods for 6 weeks to decompose and be eaten by birds and insects.


The second one is called 'Anxiety' - I ate the middle out in a performance piece. It was very cathartic. In this photograph, it has been going mouldy for 6 months.


'Anxiety'
bread, mould


This is the third one, Menopause.  Toasting it with a blowtorch was an expression of how I was struggling with symptoms of the menopause at the time.


I like to keep them for as long as possible to see how they go  mouldy.  This one showed some interesting yellow mould.


This year I planned to make body No 4 a celebration of my life being up in Edinburgh and being at art college.  Well, as so often happens with art, the final piece turned out nothing like as planned.  We ended up cooking it for 36hours in the kiln at college so it was well baked and burnt in some places.   So I then had a sculpture that reminded people of the holocaust!  It looked a bit like wood in parts.  Adjectives to describe it from my peers were: traumatic, morbid, grim, sad, like dried meat,  body bag. There is a dichotomy with it looking deathly and like body decay but it being made from bread which has an association with warmth, nurture, comfort and feeding. I watched my response to it over the ensuing days and it was one of wanting to look after it, cuddle it and put it in a nice place with flowers. Hence the photograph of me with it in the art college grounds.


Here is the bread body, 2 months after, its starting to get very mouldy inside with the bread breaking apart.